使用TensorRT对Pytorch模型加速

最近稍微学习了一下TensorRT,这里参考这很多博客,主要参考了如何使用TensorRT对训练好的PyTorch模型进行加速?。然后加上自己的一些注释。

现在训练深度学习模型主流的框架有TensorFlow,Pytorch,mxnet,caffe等。这个贴子只涉及Pytorch,对于TensorFlow的话,可以参考TensorRT部署深度学习模型,这个帖子是C++如何部署TensorRT。其实原理都是一样的,对于TensorFlow模型,需要把pb模型转化为uff模型;对于Pytorch模型,需要把pth模型转化为onnx模型;对于caffe模型,则不需要转化,因为tensorRT是可以直接读取caffe模型的;mxnet模型也是需要转化为onnx的。

对于TensorRT的安装,这里就不赘述了,之前我的博客有介绍过。

Python环境下Pytorch模型转化为TensorRT

Python环境下Pytorch模型转化为TensorRT有两种路径,一种是先把Pytorch的pt模型转化为onnx,然后再转化为TensorRT;另一种是直接把pytorch的pt模型转成TensorRT。

Pytorch->Onnx->TensorRT

首先,先把pt模型转化为onnx模型,需要安装onnx,直接pip install onnx即可。以ResNet50为例,代码如下:

1
2
3
4
5
6
7
8
9
10
11
12
13
14
15
16
import torchvision
import torch
from torch.autograd import Variable
import onnx
print(torch.__version__)

input_name = ['input']
output_name = ['output']
input = Variable(torch.randn(1, 3, 224, 224)).cuda()
model = torchvision.models.resnet50(pretrained=True).cuda()
torch.onnx.export(model, input, 'resnet50.onnx', input_names=input_name, output_names=output_name, verbose=True)

# 检查一下生成的onnx
test = onnx.load('resnet50.onnx')
onnx.checker.check_model(test)
print("==> Passed")

以上代码使用torchvision里面预训练的resnet50模型为基础,将resnet50的pt模型转化成res50.onnx,其中规定onnx的输入名是’input’,输出名是’output’,输入图像的大小是3通道224x224。其中batch size是1,其实这个batch size你可以取3、4、5等。运行这个代码就可以生成一个名为resnet50.onnx文件。

比较Pytorch和TensorRT的结果:

1
2
3
4
5
6
7
8
9
10
11
12
13
14
15
16
17
18
19
20
21
22
23
24
25
26
27
28
29
30
31
32
33
34
35
36
37
38
39
40
41
42
43
44
45
46
47
48
49
50
51
52
53
54
55
56
57
58
59
60
61
62
63
64
65
66
67
68
69
70
71
72
73
74
75
76
77
78
79
80
81
82
83
84
85
86
87
88
89
90
91
92
93
94
95
96
97
98
99
100
101
102
103
104
105
106
107
108
109
110
111
112
113
114
115
116
117
118
119
120
121
122
123
124
125
126
127
128
129
130
131
132
133
134
135
136
137
138
139
140
141
142
143
144
145
146
147
148
149
150
151
152
153
154
155
156
157
158
159
160
161
162
163
164
165
166
167
168
169
170
171
172
173
174
175
176
177
178
import pycuda.autoinit
import numpy as np
import pycuda.driver as cuda
import tensorrt as trt
import torch
import os
import time
from PIL import Image
import cv2
import torchvision

filename = 'test.jpg'
max_batch_size = 1
onnx_model_path = 'resnet50.onnx'

TRT_LOGGER = trt.Logger() # This logger is required to build an engine


def get_img_np_nchw(filename):
image = cv2.imread(filename)
image_cv = cv2.cvtColor(image, cv2.COLOR_BGR2RGB)
image_cv = cv2.resize(image_cv, (224, 224))
miu = np.array([0.485, 0.456, 0.406])
std = np.array([0.229, 0.224, 0.225])
img_np = np.array(image_cv, dtype=float) / 255.
r = (img_np[:, :, 0] - miu[0]) / std[0]
g = (img_np[:, :, 1] - miu[1]) / std[1]
b = (img_np[:, :, 2] - miu[2]) / std[2]
img_np_t = np.array([r, g, b])
img_np_nchw = np.expand_dims(img_np_t, axis=0)
return img_np_nchw


class HostDeviceMem(object):
def __init__(self, host_mem, device_mem):
"""Within this context, host_mom means the cpu memory and device means the GPU memory
"""
self.host = host_mem
self.device = device_mem

def __str__(self):
return "Host:\n" + str(self.host) + "\nDevice:\n" + str(self.device)

def __repr__(self):
return self.__str__()


def allocate_buffers(engine):
inputs = []
outputs = []
bindings = []
stream = cuda.Stream()
for binding in engine:
size = trt.volume(engine.get_binding_shape(binding)) * engine.max_batch_size
dtype = trt.nptype(engine.get_binding_dtype(binding))
# Allocate host and device buffers
host_mem = cuda.pagelocked_empty(size, dtype)
device_mem = cuda.mem_alloc(host_mem.nbytes)
# Append the device buffer to device bindings.
bindings.append(int(device_mem))
# Append to the appropriate list.
if engine.binding_is_input(binding):
inputs.append(HostDeviceMem(host_mem, device_mem))
else:
outputs.append(HostDeviceMem(host_mem, device_mem))
return inputs, outputs, bindings, stream


def get_engine(max_batch_size=1, onnx_file_path="", engine_file_path="", \
fp16_mode=False, int8_mode=False, save_engine=False,
):
"""Attempts to load a serialized engine if available, otherwise builds a new TensorRT engine and saves it."""

def build_engine(max_batch_size, save_engine):
"""Takes an ONNX file and creates a TensorRT engine to run inference with"""
with trt.Builder(TRT_LOGGER) as builder, \
builder.create_network() as network, \
trt.OnnxParser(network, TRT_LOGGER) as parser:

builder.max_workspace_size = 1 << 30 # Your workspace size
builder.max_batch_size = max_batch_size
# pdb.set_trace()
builder.fp16_mode = fp16_mode # Default: False
builder.int8_mode = int8_mode # Default: False
if int8_mode:
# To be updated
raise NotImplementedError

# Parse model file
if not os.path.exists(onnx_file_path):
quit('ONNX file {} not found'.format(onnx_file_path))

print('Loading ONNX file from path {}...'.format(onnx_file_path))
with open(onnx_file_path, 'rb') as model:
print('Beginning ONNX file parsing')
parser.parse(model.read())

print('Completed parsing of ONNX file')
print('Building an engine from file {}; this may take a while...'.format(onnx_file_path))

engine = builder.build_cuda_engine(network)
print("Completed creating Engine")

if save_engine:
with open(engine_file_path, "wb") as f:
f.write(engine.serialize())
return engine

if os.path.exists(engine_file_path):
# If a serialized engine exists, load it instead of building a new one.
print("Reading engine from file {}".format(engine_file_path))
with open(engine_file_path, "rb") as f, trt.Runtime(TRT_LOGGER) as runtime:
return runtime.deserialize_cuda_engine(f.read())
else:
return build_engine(max_batch_size, save_engine)


def do_inference(context, bindings, inputs, outputs, stream, batch_size=1):
# Transfer data from CPU to the GPU.
[cuda.memcpy_htod_async(inp.device, inp.host, stream) for inp in inputs]
# Run inference.
context.execute_async(batch_size=batch_size, bindings=bindings, stream_handle=stream.handle)
# Transfer predictions back from the GPU.
[cuda.memcpy_dtoh_async(out.host, out.device, stream) for out in outputs]
# Synchronize the stream
stream.synchronize()
# Return only the host outputs.
return [out.host for out in outputs]


def postprocess_the_outputs(h_outputs, shape_of_output):
h_outputs = h_outputs.reshape(*shape_of_output)
return h_outputs


img_np_nchw = get_img_np_nchw(filename)
img_np_nchw = img_np_nchw.astype(dtype=np.float32)

# These two modes are dependent on hardwares
fp16_mode = False
int8_mode = False
trt_engine_path = './model_fp16_{}_int8_{}.trt'.format(fp16_mode, int8_mode)
# Build an engine
engine = get_engine(max_batch_size, onnx_model_path, trt_engine_path, fp16_mode, int8_mode)
# Create the context for this engine
context = engine.create_execution_context()
# Allocate buffers for input and output
inputs, outputs, bindings, stream = allocate_buffers(engine) # input, output: host # bindings

# Do inference
shape_of_output = (max_batch_size, 1000)
# Load data to the buffer
inputs[0].host = img_np_nchw.reshape(-1)

# inputs[1].host = ... for multiple input
t1 = time.time()
trt_outputs = do_inference(context, bindings=bindings, inputs=inputs, outputs=outputs, stream=stream) # numpy data
t2 = time.time()
feat = postprocess_the_outputs(trt_outputs[0], shape_of_output)

print('TensorRT ok')

model = torchvision.models.resnet50(pretrained=True).cuda()
resnet_model = model.eval()

input_for_torch = torch.from_numpy(img_np_nchw).cuda()
t3 = time.time()
feat_2 = resnet_model(input_for_torch)
t4 = time.time()
feat_2 = feat_2.cpu().data.numpy()
print('Pytorch ok!')

mse = np.mean((feat - feat_2) ** 2)
print("Inference time with the TensorRT engine: {}".format(t2 - t1))
print("Inference time with the PyTorch model: {}".format(t4 - t3))
print('MSE Error = {}'.format(mse))

print('All completed!')

运行结果如下:

1
2
3
4
5
TensorRT ok
Pytorch ok!
Inference time with the TensorRT engine: 0.0037250518798828125
Inference time with the PyTorch model: 0.3574800491333008
MSE Error = 3.297184357139993e-12

这里测得时间有点不准,第一次运行的时间是比较长的,但是我暂时没有GPU实验,所以先不讨论这个结果了。

代码来源于PyTorch_ONNX_TensorRT

Pytorch->TensorRT

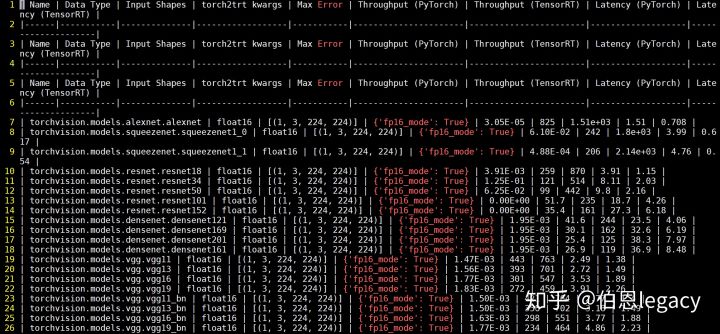
接下来介绍Python环境下,直接把Pytorch模型转化为TensorRT,参考的代码来源于NVIDIA-AI-IOT/torch2trt这个工程比较简单易懂,质量很高,安装也不难,原文作者(即下面的第一个参考链接)运行的结果如下:

img

对于你自己的Pytorch模型,只需要把代码的model进行替换即可。注意在运行过程中经常会出现”output tensor has no attribute _trt”,这是因为你模型当中有一些操作还没有实现,需要自己实现。

C++环境下Pytorch模型转化为TensorRT

C++环境下Pytorch模型转化为TensorRT有两种路径,一种是先把Pytorch的pth模型转化为onnx,然后使用TensorRT进行解析从而构造TensorRT引擎,这里和Python环境下的第一种方法大同小异;另一种是先把Pytorch的pth模型转化为onnx模型,然后使用onnx-tensorrt转换为TensorRT的trt文件,然后在C++环境下的使用TensorRT直接加载trt文件,从而构建engine。

Pytorch->Onnx->TensorRT解析

c++环境下,以TensorRT5.1.5.0的sampleOnnxMNIST为例子,用opencv读取一张图片,然后让TensorRT进行doInference输出(1,1000)的特征。代码如下所示

1
2
3
4
5
6
7
8
9
10
11
12
13
14
15
16
17
18
19
20
21
22
23
24
25
26
27
28
29
30
31
32
33
34
35
36
37
38
39
40
41
42
43
44
45
46
47
48
49
50
51
52
53
54
55
56
57
58
59
60
61
62
63
64
65
66
67
68
69
70
71
72
73
74
75
76
77
78
79
80
81
82
83
84
85
86
87
88
89
90
91
92
93
94
95
96
97
98
99
100
101
102
103
104
105
106
107
108
109
110
111
112
113
114
115
116
117
118
119
120
121
122
123
124
125
126
127
128
129
130
131
132
133
134
135
136
137
138
139
140
141
142
143
144
145
146
147
148
149
150
151
152
153
154
155
156
157
158
159
160
161
162
163
164
165
166
167
168
169
170
171
172
173
174
175
176
177
178
179
180
181
182
183
184
185
186
187
188
189
190
191
192
193
194
195
196
197
198
199
200
201
202
203
204
205
206
207
208
209
210
211
212
213
214
215
216
217
218
219
220
221
222
223
224
225
226
227
228
229
230
231
232
233
234
235
236
237
238
239
240
241
242
243
244
245
246
247
248
249
250
251
252
253
254
255
#include <algorithm>
#include <assert.h>
#include <cmath>
#include <cuda_runtime_api.h>
#include <fstream>
#include <iomanip>
#include <iostream>
#include <sstream>
#include <sys/stat.h>
#include <time.h>
#include <opencv2/opencv.hpp>
#include "NvInfer.h"
#include "NvOnnxParser.h"
#include "argsParser.h"
#include "logger.h"
#include "common.h"
#include "image.hpp"
#define DebugP(x) std::cout << "Line" << __LINE__ << " " << #x << "=" << x << std::endl


using namespace nvinfer1;

static const int INPUT_H = 224;
static const int INPUT_W = 224;
static const int INPUT_C = 3;
static const int OUTPUT_SIZE = 1000;

//指定输入输出名称
const char* INPUT_BLOB_NAME = "input";
const char* OUTPUT_BLOB_NAME = "output";

const std::string gSampleName = "TensorRT.sample_onnx_image";


samplesCommon::Args gArgs;


bool onnxToTRTModel(const std::string& modelFile, // name of the onnx model
unsigned int maxBatchSize, // batch size - NB must be at least as large as the batch we want to run with
IHostMemory*& trtModelStream) // output buffer for the TensorRT model
{
// 1. create the builder
//创建一个 IBuilder,传进gLogger参数是为了方便打印信息,gLogger是一个日志类,在common.h文件中定义
//builder 这个地方感觉像是使用了建造者模式。
IBuilder* builder = createInferBuilder(gLogger.getTRTLogger());
assert(builder != nullptr);
//创建一个 network对象,但是这个network对象只是一个空架子,里面的属性还没有具体的数值。
nvinfer1::INetworkDefinition* network = builder->createNetwork();

//创建一个onnx模型解析对象parser
auto parser = nvonnxparser::createParser(*network, gLogger.getTRTLogger());
//Optional - uncomment below lines to view network layer information
//config->setPrintLayerInfo(true);
//parser->reportParsingInfo();

//调用解析函数parseFromFile填充network对象,将onnx中的tensor解析为tensorRT中的tensor,此处使用到了模型文件,还用到了 common.cpp 文件中的辅助函数:locateFile( )
if ( !parser->parseFromFile( locateFile(modelFile, gArgs.dataDirs).c_str(), static_cast<int>(gLogger.getReportableSeverity()) ) )
{
gLogError << "Failure while parsing ONNX file" << std::endl;
return false;
}

// Build the engine
// 设置batch size;实际推理时不能大于该batch size
builder->setMaxBatchSize(maxBatchSize);
//builder->setMaxWorkspaceSize(1 << 20);
// 设置工作空间 size,Layer algorithms often require temporary workspace.
builder->setMaxWorkspaceSize(10 << 20);
// 设置推理方式
builder->setFp16Mode(gArgs.runInFp16);
builder->setInt8Mode(gArgs.runInInt8);

if (gArgs.runInInt8)
{
samplesCommon::setAllTensorScales(network, 127.0f, 127.0f);
}

samplesCommon::enableDLA(builder, gArgs.useDLACore);

// 2. Build engine
//使用network创建 CudaEngine,优化方法在这里执行。
//至此,Onnx模型已转换为tensorRT object。
ICudaEngine* engine = builder->buildCudaEngine(*network);
assert(engine);

// we can destroy the parser
parser->destroy();

// serialize the engine, then close everything down
//将转换好的tensorRT object序列化到内存中,trtModelStream是一块内存空间。
//这里也可以序列化到磁盘中。
trtModelStream = engine->serialize();
engine->destroy();
network->destroy();
builder->destroy();

return true;
}

void doInference(IExecutionContext& context, float* input, float* output, int batchSize)
{
// 使用传进来的context恢复engine。
const ICudaEngine& engine = context.getEngine();
//engine.getNbBindings()是为了获取与这个engine相关的输入输出tensor的数量。
//这个地方,输入+输出 总共就2个,所以做个验证。
// input and output buffer pointers that we pass to the engine - the engine requires exactly IEngine::getNbBindings(),
// of these, but in this case we know that there is exactly one input and one output.
assert(engine.getNbBindings() == 2);
//void* 型数组,主要用于下面GPU开辟内存。
void* buffers[2];

// In order to bind the buffers, we need to know the names of the input and output tensors.
// note that indices are guaranteed to be less than IEngine::getNbBindings()
//获取与这个engine相关的输入输出tensor的索引。
const int inputIndex = engine.getBindingIndex(INPUT_BLOB_NAME);
const int outputIndex = engine.getBindingIndex(OUTPUT_BLOB_NAME);

DebugP(inputIndex); DebugP(outputIndex);
//为输入输出tensor开辟显存。
// create GPU buffers and a stream
CHECK(cudaMalloc(&buffers[inputIndex], batchSize * INPUT_C * INPUT_H * INPUT_W * sizeof(float)));
CHECK(cudaMalloc(&buffers[outputIndex], batchSize * OUTPUT_SIZE * sizeof(float)));

//创建cuda流,用于管理数据复制,存取,和计算的并发操作
cudaStream_t stream;
CHECK(cudaStreamCreate(&stream));

//从内存到显存,从CPU到GPU,将输入数据拷贝到显存中
//input是读入内存中的数据;buffers[inputIndex]是显存上的存储区域,用于存放输入数据
// DMA the input to the GPU, execute the batch asynchronously, and DMA it back:
CHECK(cudaMemcpyAsync(buffers[inputIndex], input, batchSize * INPUT_C * INPUT_H * INPUT_W * sizeof(float), cudaMemcpyHostToDevice, stream));
//启动cuda核,异步执行推理计算
context.enqueue(batchSize, buffers, stream, nullptr);
//从显存到内存,将计算结果拷贝回内存中
//output是内存中的存储区域;buffers[outputIndex]是显存中的存储区域,存放模型输出.
CHECK(cudaMemcpyAsync(output, buffers[outputIndex], batchSize * OUTPUT_SIZE * sizeof(float), cudaMemcpyDeviceToHost, stream));
//这个是为了同步不同的cuda流。
cudaStreamSynchronize(stream);

//销毁流对象和释放显存
// release the stream and the buffers
cudaStreamDestroy(stream);
CHECK(cudaFree(buffers[inputIndex]));
CHECK(cudaFree(buffers[outputIndex]));
}

//!
//! \brief This function prints the help information for running this sample
//!
void printHelpInfo()
{
std::cout << "Usage: ./sample_onnx_mnist [-h or --help] [-d or --datadir=<path to data directory>] [--useDLACore=<int>]\n";
std::cout << "--help Display help information\n";
std::cout << "--datadir Specify path to a data directory, overriding the default. This option can be used multiple times to add multiple directories. If no data directories are given, the default is to use (data/samples/mnist/, data/mnist/)" << std::endl;
std::cout << "--useDLACore=N Specify a DLA engine for layers that support DLA. Value can range from 0 to n-1, where n is the number of DLA engines on the platform." << std::endl;
std::cout << "--int8 Run in Int8 mode.\n";
std::cout << "--fp16 Run in FP16 mode." << std::endl;
}

int main(int argc, char** argv)
{
bool argsOK = samplesCommon::parseArgs(gArgs, argc, argv);
if (gArgs.help)
{
printHelpInfo();
return EXIT_SUCCESS;
}
if (!argsOK)
{
gLogError << "Invalid arguments" << std::endl;
printHelpInfo();
return EXIT_FAILURE;
}
if (gArgs.dataDirs.empty())
{
gArgs.dataDirs = std::vector<std::string>{"data/samples/mnist/", "data/mnist/"};
}

auto sampleTest = gLogger.defineTest(gSampleName, argc, const_cast<const char**>(argv));

gLogger.reportTestStart(sampleTest);

// create a TensorRT model from the onnx model and serialize it to a stream
IHostMemory* trtModelStream{nullptr};

// 执行onnxToTRTModel
if (!onnxToTRTModel("resnet50.onnx", 1, trtModelStream))
gLogger.reportFail(sampleTest);

assert(trtModelStream != nullptr);
std::cout << "Successfully parsed ONNX file!!!!" << std::endl;


std::cout << "Start reading the input image!!!!" << std::endl;

cv::Mat image = cv::imread(locateFile("test.jpg", gArgs.dataDirs), cv::IMREAD_COLOR);
if (image.empty()) {
std::cout << "The input image is empty!!! Please check....."<<std::endl;
}
DebugP(image.size());
cv::cvtColor(image, image, cv::COLOR_BGR2RGB);

cv::Mat dst = cv::Mat::zeros(INPUT_H, INPUT_W, CV_32FC3);
cv::resize(image, dst, dst.size());
DebugP(dst.size());

float* data = normal(dst);

// 创建运行时环境 IRuntime对象,传入 gLogger 用于打印信息
// deserialize the engine
IRuntime* runtime = createInferRuntime(gLogger);
assert(runtime != nullptr);
if (gArgs.useDLACore >= 0)
{
runtime->setDLACore(gArgs.useDLACore);
}

ICudaEngine* engine = runtime->deserializeCudaEngine(trtModelStream->data(), trtModelStream->size(), nullptr);
assert(engine != nullptr);
trtModelStream->destroy();
// 创建上下文环境,主要用于inference 函数中启动cuda核
IExecutionContext* context = engine->createExecutionContext();
assert(context != nullptr);

float prob[OUTPUT_SIZE];
typedef std::chrono::high_resolution_clock Time;
typedef std::chrono::duration<double, std::ratio<1, 1000>> ms;
typedef std::chrono::duration<float> fsec;
double total = 0.0;

// deploy 阶段:调用 inference 函数,进行推理过程
// run inference and cout time
auto t0 = Time::now();
doInference(*context, data, prob, 1);
auto t1 = Time::now();
fsec fs = t1 - t0;
ms d = std::chrono::duration_cast<ms>(fs);
total += d.count();
// 销毁无用对象
// destroy the engine
context->destroy();
engine->destroy();
runtime->destroy();

std::cout << std::endl << "Running time of one image is:" << total << "ms" << std::endl;

gLogInfo << "Output:\n";
for (int i = 0; i < OUTPUT_SIZE; i++)
{
gLogInfo << prob[i] << " ";
}
gLogInfo << std::endl;

return gLogger.reportTest(sampleTest, true);
}

其中,image.cpp的代码为:

1
2
3
4
5
6
7
8
9
10
11
12
13
14
15
16
17
18
19
20
21
22
23
24
25
26
27
28
29
30
31
32
33
34
35
36
#include <opencv2/opencv.hpp>
#include "image.hpp"

static const float kMean[3] = { 0.485f, 0.456f, 0.406f };
static const float kStdDev[3] = { 0.229f, 0.224f, 0.225f };
static const int map_[7][3] = { {0,0,0} ,
{128,0,0},
{0,128,0},
{0,0,128},
{128,128,0},
{128,0,128},
{0,128,0}};


float* normal(cv::Mat img) {
//cv::Mat image(img.rows, img.cols, CV_32FC3);
float * data;
data = (float*)calloc(img.rows*img.cols * 3, sizeof(float));

for (int c = 0; c < 3; ++c)
{

for (int i = 0; i < img.rows; ++i)
{ //获取第i行首像素指针
cv::Vec3b *p1 = img.ptr<cv::Vec3b>(i);
//cv::Vec3b *p2 = image.ptr<cv::Vec3b>(i);
for (int j = 0; j < img.cols; ++j)
{
data[c * img.cols * img.rows + i * img.cols + j] = (p1[j][c] / 255.0f - kMean[c]) / kStdDev[c];

}
}

}
return data;
}

image.hpp的内容为:

1
2
3
4
5
6
7
8
#pragma once
typedef struct {
int w;
int h;
int c;
float *data;
} image;
float* normal(cv::Mat img);

运行结果为:

img

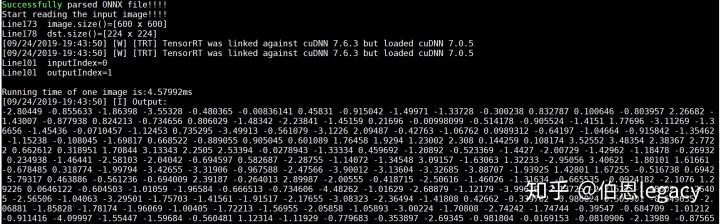
同样的test.jpg在python环境下的运行结果为:

img

可以发现,c++环境下resnet50输出的(1,1000)的特征与Python环境下feat1(TensorRT)和feat2(pytorch)的结果差距很小。

总结:

  1. onnxToTRTModel的过程为:创建一个builder和network,使用parser解析Onnx模型填充network;使用builder类的方法设置batch size、workspace、推理方法(fp32、fp16、int8)。使用builder->buildCudaEngine(*network)执行优化方法创建engine。因为一个模型从导入到生成Engine是需要花费一些时间的,所以可以将engine序列化到内存或者存储文件中,便于使用(需要注意的是,若将序列化文件存储到了文件中,该文件和GPU平台高度相关,换一个平台需要重新生成该文件)。最后是销毁一些中间变量parserenginenetworkbuilder
  2. mian函数主要过程为:执行onnxToTRTModel函数得到序列化engine——内存中的trtModelStream。创建运行时环境 IRuntime对象runtime,然后使用该对象反序列化trtModelStream得到engine;使用engine创建上下文环境context,主要用于inference 函数中启动cuda核。执行doInference函数过程。然后销毁contextengineruntime
  3. doInference函数的主要过程为:从上下文环境context恢复engine。为输入输出tensor开辟显存,到void* buffers中。创建cuda流,用于管理数据复制,存取,和计算的并发操作。从内存到显存,从CPU到GPU,将输入数据拷贝到显存中。启动cuda核,异步执行推理计算。从显存到内存,将计算结果拷贝回内存中。同步不同的cuda流。销毁流对象stream和释放显存buffers

Pytorch->Onnx->TensorRT模型

上面的是将pytorch首先转化为onnx,然后让TensorRT解析onnx从而构建TensorRT引擎。那么我们如何让TensorRT直接加载引擎文件呢,也就是说,我们先把onnx转化为TensorRT的trt文件,然后让c++环境下的TensorRT直接加载trt文件,从而构建engine。

在这里我们首先使用onnx-tensorrt这个项目来使resnet50.onnx转化为resnet50.trt。采用的项目是onnx-tensorrt这个项目的安装也不难,这个也在我之前的博客里面有介绍,所以不展开了。

运行如下命令,就可以获得rensnet50.trt这个引擎文件

1
onnx2trt resnet50.onnx -o resnet50.trt

需要注意的是,onnx-tensort这个项目在编译的时有一个指定GPU计算能力的选项,如下图所示:

img

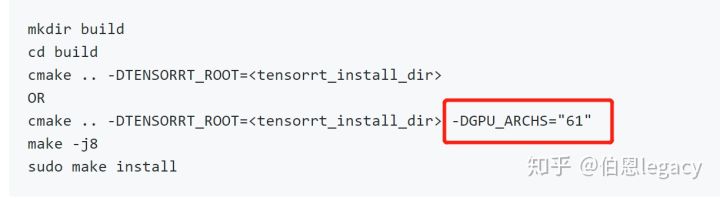
另外在onnx2trt命令有个-b操作,是指定生成的trt文件的batch size的。在实际test过程中,你的batch size是多少,这个就设置成多少。按照下面参考链接1作者的说法:

记得我当时trt文件的batch size是1,但是我实际的batch size是8,运行后,只有一张图片有结果,其他7张图片都是0。

还有,导出onnx模型时,网络的数据输入要和TensorRt数据输入大小保持一致(b,c,w,h)。对于retinaface,若不这样做,否则可能因为特征图大小不一样,导致预测的anchor偏置数量与预设anchor数量不一致。在进行后处理时导致访问非法内存。

如果能顺利生成trt文件的话,在代码中可以直接添加以下函数,来生成engine, 其他就不需要改变。

1
2
3
4
5
6
7
8
9
10
11
12
13
14
15
16
17
18
19
20
21
22
23
24
25
26
27
28
29
30
bool read_TRT_File(const std::string& engineFile, IHostMemory*& trtModelStream)
{
std::fstream file;
std::cout << "loading filename from:" << engineFile << std::endl;
nvinfer1::IRuntime* trtRuntime;
//nvonnxparser::IPluginFactory* onnxPlugin = createPluginFactory(gLogger.getTRTLogger());
file.open(engineFile, std::ios::binary | std::ios::in);
file.seekg(0, std::ios::end);
int length = file.tellg();
std::cout << "length:" << length << std::endl;
file.seekg(0, std::ios::beg);
std::unique_ptr<char[]> data(new char[length]);
file.read(data.get(), length);
file.close();
std::cout << "load engine done" << std::endl;
std::cout << "deserializing" << std::endl;
// 创建运行时环境 IRuntime对象,传入 gLogger 用于打印信息
trtRuntime = createInferRuntime(gLogger.getTRTLogger());
//ICudaEngine* engine = trtRuntime->deserializeCudaEngine(data.get(), length, onnxPlugin);
// 反序列化前向引擎
ICudaEngine* engine = trtRuntime->deserializeCudaEngine(data.get(), length, nullptr);
std::cout << "deserialize done" << std::endl;
assert(engine != nullptr);
std::cout << "The engine in TensorRT.cpp is not nullptr" <<std::endl;
//将转换好的tensorRT object序列化到内存中,trtModelStream是一块内存空间。
//这里也可以序列化到磁盘中。
// Serialize engine and destroy it
trtModelStream = engine->serialize();
return true;
}

如果想保存引擎文件的话,可以在自己的代码中添加这几句话,就可以生成trt文件,然后下次直接调用trt文件。

1
2
3
4
5
6
7
nvinfer1::IHostMemory* data = engine->serialize();
std::ofstream file;
file.open(filename, std::ios::binary | std::ios::out);
cout << "writing engine file..." << endl;
file.write((const char*)data->data(), data->size());
cout << "save engine file done" << endl;
file.close();

总结

按照目前我的观察,这里只说C++接口,按照第一种方法可以在导出Onnx模型后,使用C++代码控制使用fp32、fp16或者int8进行推理,但是若按照第二种方法,无法使用C++代码控制使用fp32、fp16或者int8进行推理,虽然onnx2trt有一个-d参数指明是float32还是float16,但即便是这样,按照How to use FP16 ot INT8? #32,好像也有很多坑待填。

参考

如何使用TensorRT对训练好的PyTorch模型进行加速?
TensorRT(1)-介绍-使用-安装
TensorRT(2)-基本使用:mnist手写体识别
caffe模型TensorRT部署实践(一)
The TensorRT support multi-gpus inference? #322

------ 本文结束------
坚持原创技术分享,您的支持将鼓励我继续创作!

欢迎关注我的其它发布渠道